Maki Sushi – Taiwanese Style
I will never forget the the first time I went to a sushi restaurant in New York City. It was summer of 1995, and my boyfriend at the time wanted to impress me by taking me to an authentic Japanese restaurant and introducing me to authentic sushi. Up until then I have only had maki-sushi, or sushi rolls, that my mom would prepare at home, and it was my boyfriend’s opinion that I was never properly introduced to “true” Japanese sushi. 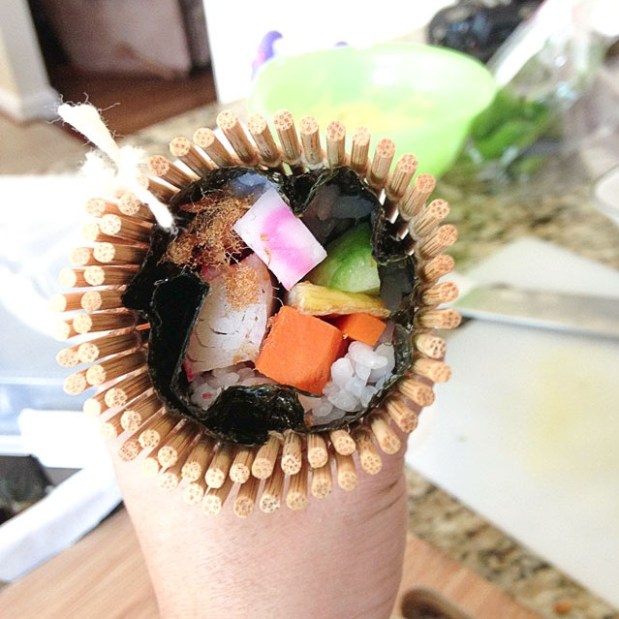
As we settled ourselves at the table and started perusing the menu, I suddenly heard someone behind the counter say “Jin wan di yi se sia mi?” My brain did a little swirl, as it always does when I hear a foreign language that I understand, but it took me only a second to realize what I was hearing. It was Taiwanese! The regional dialect of people from Taiwan, of which there were only 20 million or so in the world (mind you this was over 20 years ago), and fewer who were able to speak it accurately. I knew the dialect well since it was the only dialect my grandma spoke, so there was no mistaking that it was Taiwanese. The man saw me staring at him, and he immediately knew I understood him. For the rest of the evening, aside from a short answers he would give his manager in the kitchen (who was also speaking Taiwanese), he pretty much kept quiet, trying very hard to appear Japanese.
I had many more sushi meals in New York after that evening, and I quickly learned that many of the sushi restaurants in the city at that time were run by the Taiwanese or the Koreans. Sometimes my Taiwanese guests would strike up a conversation with the Taiwanese sushi chef, and over time I learned that many of the Taiwanese chefs did train (or at least claim to have trained) either in Japan or with a Japanese sushi chef for some period of time. I can’t speak to whether the sushi restaurants in New York are still mainly run by the Taiwanese or not today, but over time, one can’t deny that Americans have acquired a taste for this non-Japanese sushi. You don’t need an expert economist to tell you that sushi has become a mainstay in the American diet – just go to any strip mall or food court in American and I guarantee you will find some sushi.
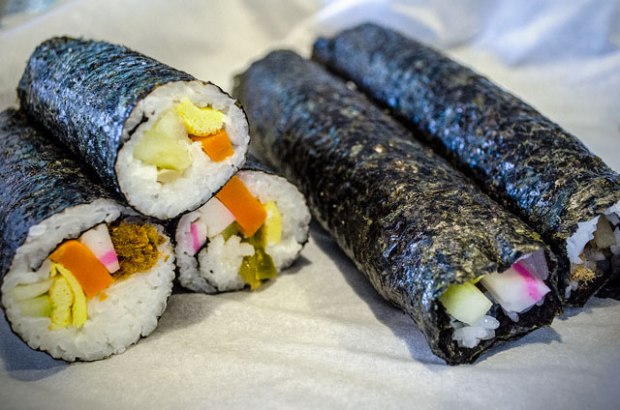
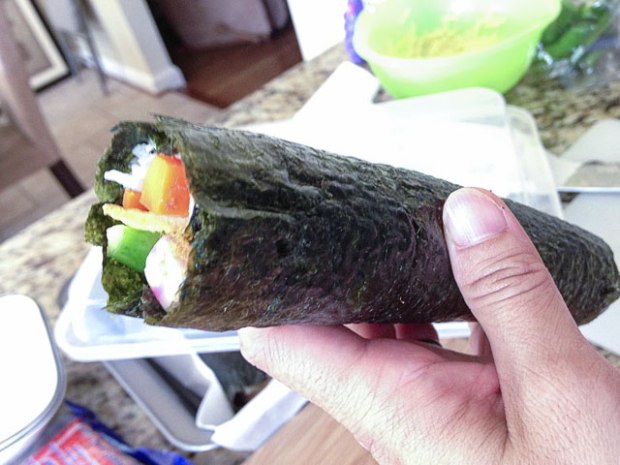
But going back to the origin of this story – my mom’s maki sushi, sometimes called futomaki, are still one of my favorite foods to eat and to prepare, and a party favorite for any occasion. It does takes time to blend the rice, spread it evenly on the paper-thin nori, to prep all the little strips of veggies and meats, and it does takes a little bit of practice to learn to roll and cut, but it is all worth it when you put it in your mouth. This version I made here did not contain any raw fish, but it does contain fishcakes, imitation crab meat, and pork sung. If you do choose to use raw fish, make sure it is sushi-quality fish, and that it has been frozen for at least 24 hours prior to using, and then thawed just long enough for the meal.
Preparation
- 1 Egg – beaten well
- 2 Japanese cucumbers, if you can’t find those, then persian cucumber or mini cucumber would work too
- 2 medium carrots, peeled
- 1 block of kamaboko – fishcake product you can buy at any Asian food store
- 6 sticks of imitation crab meat – it is also a type of kamaboko, but with a different texture and taste
- Pork sung, to taste
- 2 cups of sushi rice, or medium grained Asian rice would work
- 1 package of sushi nori (seaweed), about 8-10 sheets
- 3 cups of filtered water
- 1/3 to 1/2 cup Sushi vinegar
- Salt
- Oil, preferably vegetable oil, but olive oil is okay
Materials you will need
- 1 4qt pot, or rice cooker
- 1 small 10″ frying pan
- 1 small pot (2 qts)
- 1 baking/cookie sheet
- cellophane wrap
- rice paddle
- sushi mat for rolling
- a very sharp cooking knife
- a wet washcloth
Preparing the Rice
In a 4qt. pot (or rice cooker pot if available), wash the rice throughly by filling up the bowl with water and stirring with your hands or wooden paddle, then pouring the water out completely. Repeat until the water is completely clear. Drain all the water out of the rice and pot, then fill with the 3 cups of filtered water. Use your rice cooker to cook the rice, or bring the pot of rice to a boil on the stove, then immediately cover and simmer for about 20 minutes. Do not open the lid to the pot for the first 10 minutes of cooking. After the first 10 minutes, you can take little peeks into the pot to see if the rice is done, but keep the lid on as much as possible as the steam is a major proponent of properly cooked rice. The rice is done when it is not wet or surrounded by any liquid, and the kernels of rice are soft and clumpy, not mushy and soupy.
While you are waiting for the rice to cook, jump to the section on preparing the other ingredients, then come back here when your rice is done.
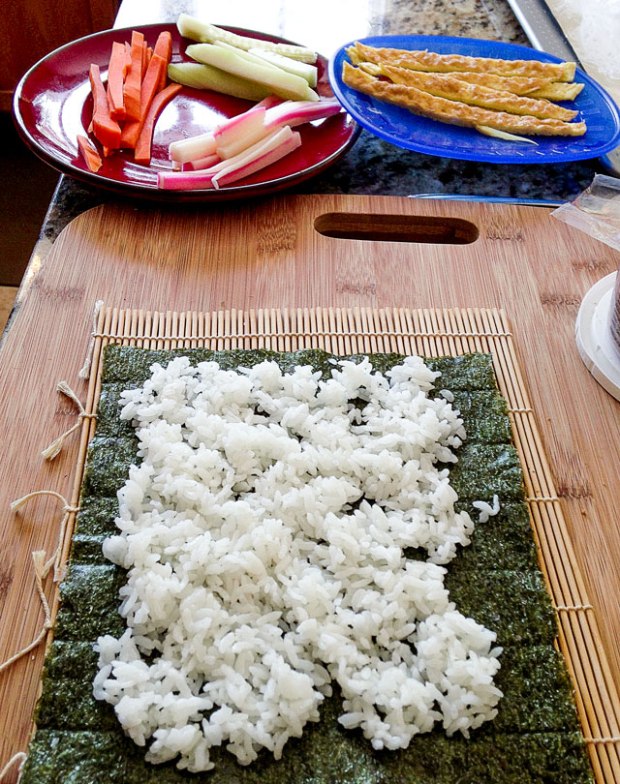
Once the rice is done, remove from heat, and let sit for an additional 5-10 minutes with the lid closed to let the rice absorb any remaining fluids. Pull out your cookie sheet and set on your workspace. Working quickly, scoop out half of the rice from the pot and place into a pile on the cookie sheet. Pour half of the sushi vinegar onto the rice, and mix in evenly into the rice. Taste the rice – it should taste slightly sweet and vinegary, it should not be overpowering. If you can barely taste it, then add some more sushi vinegar. Once evenly blended, gently spread the rice out so that it covers the entire cookie sheet with a sheet of rice, about 1/2 inch thick. Roll out a piece of cellophane wrap that is large enough to cover the rice, and place it on top of the rice-covered cookie sheet.
Note: Why do I need to use a cookie sheet? This is a quick way to prep the sushi rice and cool it down for the next step. By spreading the rice out on the cookie sheet, it also makes it a little easier to place on the nori later on, since the rice will already be spread out in a thin layer as opposed to a large clump that you would have to work harder to separate while sitting on a fragile piece of seaweed.
Preparing the filling
Cooking (some of) the filling
Heat the small frying pan with 1/2 tablespoon of oil, coat the pan evenly. Once the oil is shimmery, turn the heat down to medium/low, and pour beaten egg into the pan. Swivel the pan gently so that the egg coats the entire bottom of the frying pan, then set the pan back onto the flames. Let it fry for about a minute, or until the edges start perking up. Gently and carefully flip the sheet of egg over completely. Turn off flames but keep egg in the pan to cook a little longer and to cool.
Fill small pot with about half a pot of water and 1 teaspoon of salt, bring to boil. Drop carrots into the boiling water (if necessary, cut the carrots just short enough so that it fits inside the pot), boil for 1 minute. Turn off heat, but leave carrots in the water for another minute, then remove and drain.
Note: Why do I need to cook the carrots? Carrots are extremely flavorful and hard, which can throw off the balance of the sushi roll, so we want to soften the carrot a little bit by boiling it, and the salt water also mutes some of the carrot’s flavor so that it better complements the rice and the nori. Other vegetables that people use in rolls that could benefit from being braised before use may include leafy greens like spinach or kale, and root vegetables like daikon or yam.
Cutting the filling
Cut all of the fillings to approximately the same width and thickness, about 1/2 inch wide and 1/4 inch thick (see image above). The length may be vary for each item, ie the cucumbers might be shorter than the carrots, and that is okay.
Rolling the maki sushi
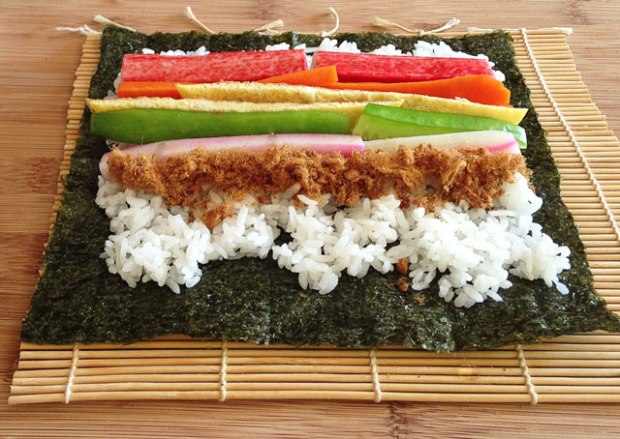
I think the picture above does a better job of explaining how to lay everything out. Note that when you spread the rice, don’t spread it all the way to the edges. Leave about 1/2 inch border of nori around the top, left, and right sides, and about 1 inch border on the bottom edge of the nori. Line the top of the nori sheet with the top of the bamboo mat. Align all the fillings also with the top of the nori sheet, so that there is a strip of white rice with no fillings on top of it at the bottom of the sheet.


Start rolling by lifting up the top of the bamboo mat with the nori, and folding this top edge over JUST the filling, not all the way to the bottom of the nori sheet. In other words, the top of the nori should touch back down onto the strip of white rice with no filling on it. Gently press the top edge onto the strip of white rice so that it sticks a little. also gently squeeze the partial roll you have created so far to allow the rice and the fillings to start sticking together.

Now you are going to lift up just the top of the bamboo sheet away from the nori, and use the middle part of the bamboo mat to continue rolling the sushi into a cylinder. 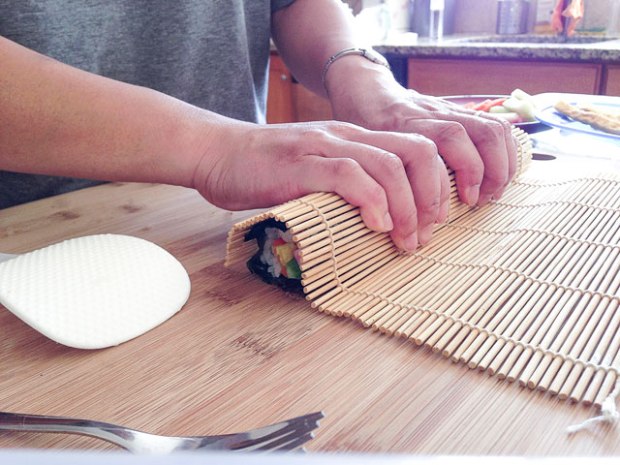
Gently apply pressure to the roll again, and then tuck the bamboo mat back around to encircle the entire sushi roll. Lift up the bamboo mat with the sushi roll in it, then again gently squeeze evenly across the entire roll so that everything sticks together. You know you have succeeded when you unwrap the sushi roll and nothing is coming apart!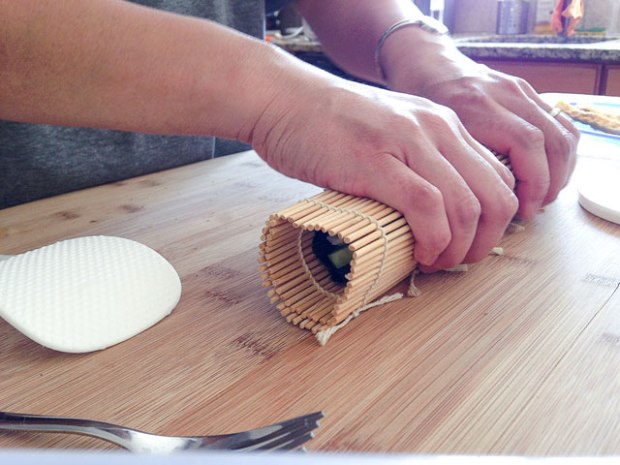
How to cut the sushi roll
Cutting the sushi roll is pretty easy, you just need a very sharp knife and a wet/very damp washcloth. First cut the sushi roll in half. Working with the cut end of one of the halves, wet the knife, and cut the sushi pieces to your desired thickness, then wipe the knife with the damp cloth each time before you cut again. I can usually get 8 pieces out of each whole roll. The ends of the rolls will not be as pretty as the ones from the middle, you can either toss them or eat them yourself. Arrange the cut pieces with the cut side up, serve with soy sauce, wasabi, and sushi ginger. Enjoy!
By the way, that Taiwanese sushi chef, curious to know what he said in Taiwanese? He was asking his manager what the Special fish was going to be that night, and if I remember correctly, it was the fatty tuna Toro.
